Here are collection of Windows 8 Shortcut key but i often called it HOT KEY or Combo Key Try it your self :)
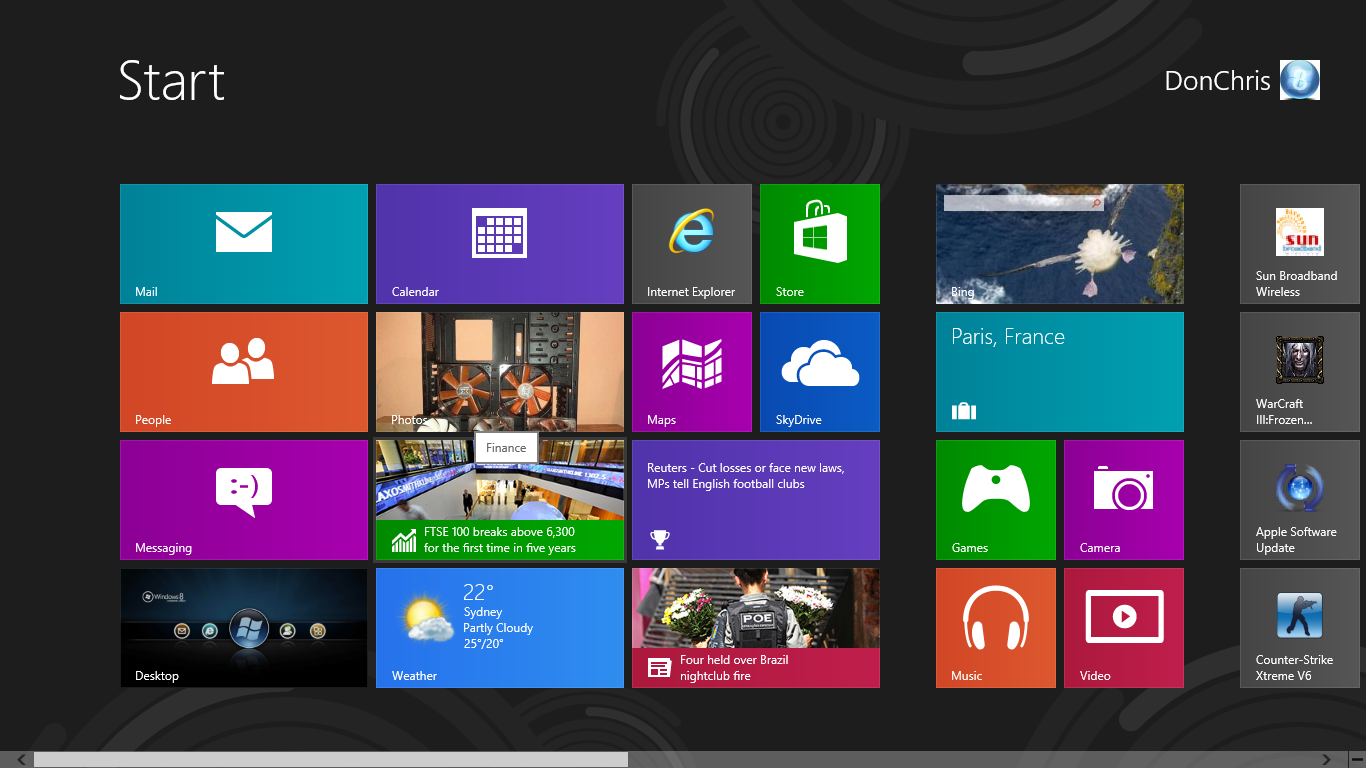
Press [Windows Key] to enter the tiled Start screen. [Windows Key] + M minimizes everything that's showing on the desktop. [Windows Key] + E opens Explorer for quick access to folders.
On the Start screen, press [Windows Key] + D to instantly get to the desktop. [Windows Key] + I opens the settings menu, giving you quick access to the Control Panel, Professionalization, and your Power button, among other features. [Windows Key] + R prompts the Run command useful for quickly launching apps and other routines with a command prompt. [Windows Key] + Print Screen takes a screenshot and saves it in a Screenshots folder nested in your Pictures folder.
To take a screenshot on a Windows 8 tablet, simultaneously press the Windows button and the volume-down button on the tablet chassis. [Windows Key] + Q opens a global search menu. Type what you're looking for and where you would like to look. [Windows Key] + Tab opens a list of currently running programs. [Windows Key] + O locks orientation on devices with an accelerometer. [Windows Key] + F opens a file and folder search. [Windows Key] + Pause opens the system properties page to show you a quick rundown of your specs.
[Windows Key] + "," (that's the comma sign!) makes all current windows transparent, giving you a peek at the desktop as long as you hold down [Windows Key]. [Windows Key] + "." (the period) snaps a window to the right or left side (toggling each time you press "."). [Windows Key] + W opens a search in your system settings to quickly locate and change system properties. [Windows Key] + X opens the Quick Access Menu, exposing system functionality such as the Command Prompt, Disk Management, File Explorer, Run, and more. It's perfect for people who Start Menu. Alternately, you can right-click on the bottom right corner of the screen to spawn the Quick Access Menu.
Overclockers from around the world compete to get the highest MHz values and fastest components that they can. And how they compare those results? They do lots of benchmarks and show off with the highest scores possible, but these tests are not only to rate a component, they are also used to determine stability.
After any overclock, it’s best that you do one of these stability tests to ensure that your computer is ok and that it is working good. Testing for errors is crucial, and with these programs you will be able to test your computer also. Why do we use stress tests and how they work
As we’ve mentioned before, these programs test your computer’s stability and give it a rating. They do this by taking a certain component to the maximum of its capabilities and checking if there is any problem with it. The information that is gathered by the program will be used sometimes to generate graphs and let you see how your computer works over time.
They use the computer’s own sensors to read information on its temperature, and how well it fares with the settings that it has. If there is a problem, the test is interrupted either by the benchmarking tool, or by the computer (blue screen). Also, these programs check the data when available (read, write speeds or other information) and users can check these to see if there is an improvement or to see if there is something wrong. WHAT CAN YOU TEST?
The data collected depends on each program, most of them only test one component, so for hard drive,s you will have read and write speeds, bad sectors (if any) and temperature. For a GPU (video card), the program will look at the frame rate (FPS- frames per second) and give you your maximum FPS, minimum FPS and average FPS and also the temperature of the card. When testing CPUs, the result will most likely be in OPS (operations per second), power drain, temperature and overall stability.
There are other programs that monitor the computer’s PSU (power supply unit) and these will give the user information for each rail (current, voltage or power). In some cases, the program will generate a graph, showing the user the different drops in power that each rail might have. Also, memory testers a good way to see how your RAM is holding out, giving you read/write data, access times, latency and voltage measures. The best stress test software for you GPU
Probably the biggest number of benchmark tools are for video cards. These programs can render an image that will utilize your video card to the maximum, carefully logging every change in temperature and in FPS. Users who want to test their video cards can try some of these programs:
These programs use your processor at 100% of its capacity and calculate how many operations it can do, what temperature it has and how stable is the overclock. Testing out your CPU after every OC (overclocking) is necessary to ensure that it works properly. Here are a few benchmarks to get you going:
Usually, memory scanners come as a package with other scanners, and so, there are not many stand-alone RAM benchmark tools, but this one would do fine for most. It will check the latency of the memory and the speeds at which it writes and reads.
- MaxxMEM
FULL SCANNERS
These programs are not like the ones before, they have numerous tools and they can test almost all the components on your computer. If you want an overall performance scan and stress test, then these should do fine.
Of course, these are not all the benchmarking tools available, but they should cover pretty much any benchmarking need. Keep in mind that benchmarks are dangerous and the stress they put on the components can lead to malfunctions and even render them unusable. Also, when benchmarking, close all other programs that are running, except the test software, in this way you will get accurate data.
Very important is to closely monitor the temperatures of your computer while testing, do the tests at room temperature for accurate data, or if you are gunning for the highest score, do them at a lower temperature. Use tools like Core Temp to monitor the values of the temperature and unless there is a problem, do not interrupt the test.
It is also a good idea to keep an eye on your PSU while testing, if the computer is overclocked, while the test is running, the PSU will be at a much higher load.
Windows 8 is up and running. It has lots and lots of new features, new user interface and an overall new feel. If you think “Well, this is awesome and I like Windows 8”, then the following tutorial won’t be of much help to you. On the other hand, if you think that Microsoft’s “new and improved” operating system is not the one for you (and I can honestly understand why not), then you might want to go back to Windows 7 (or Vista, which is a bad idea).
Recently, this became a problem for those who have bought computers or laptops produced by HP that came with the Windows 8 OEM installed. At that time, HP declared that they will not offer support for anyone who will downgrade to Windows 7 from Windows 8, thus creating quite a stir among the owners of HP computers. Much to their relief, HP has updated their policy and now users can downgrade to Windows 7 without voiding their warranty. Maybe other OEMs will follow HP’s example.
Downgrading from Windows 8 to Windows 7
Microsoft allows users who own a copy of Windows 8 Pro to downgrade to an older version of Windows, be it 7 or Vista (downgrade to XP is not supported), as they had done with previous versions of Windows, as we can see from the Windows 8 license agreement:
Instead of using the Windows 8 Pro software, you may use one of the following earlier versions: Windows 7 Professional or Windows Vista Business.
Now that you have caught your breath knowing that you have the possibility to downgrade, let’s move on to the next step: how to downgrade to Windows 7 from Windows 8?
There is no easy way to do this, because Microsoft does not provide such a tool in any of their operating systems. Also, I have consulted with the Microsoft website and there is no information available on how to downgrade your Windows operating system. This means that only those who have OEM licenses of Windows 8 can downgrade to Windows 7, but the downgrade must be done by the computer manufacturer. If you only bought a retail version of Windows 8, you are left with one option: buy a copy of Windows 7 (if you do not have one yet) and install it on your computer. INSTALLING WINDOWS 7 OVER WINDOWS 8
If you are installing a new OS on your device, there are a few steps you must undergo before starting. First of all, determine if there is any information on your C: partition that you want to keep. If so, copy it on your other partitions/cloud service/external drive. Also, just to be safe, you can make a disk image of your C: drive as a backup, just in case you will encounter errors and need to revert to Windows 8. After saving all your files, you can continue by making a boot-able drive with Windows 7. For this, you will need the .ISO image file of Windows 7 and a DVD or USB flash drive (the flash drive must have at least 8GB ).
- Creating a boot-able DVD
If you want to create a DVD with Windows 7, you will need to install a program called Nero. This is allow you to create a boot-able DVD very quickly with next to no effort. After installing Nero, stick in your blank DVD and in the Nero main screen select “DVD” and “Open”, now you have to browse for your .ISO file. After opening the file, click on “Burn” and wait for the burning process to complete.
-Creating a boot-able USB Flash Drive
If you will be installing Windows 7 from a USB flash drive, you will notice that there are lots of utilities around the web that allow you to accomplish this, but from personal experience, I would recommend doing this the old fashioned way, with Command Prompt. Also, remember that you will need a USB flash drive that has 8GB or more, and before you start, copy all your files from the flash drive, because this process will erase all the data from the USB flash drive. This is how to do it:
Search for “CMD” and run it as administrator (it is crucial that you run it this way, otherwise it will give you an error later on)
After the command prompt window opens, type “DISKPART” and enter the following commands in this order:
1. “LIST DISK”
2. A list will appear with all the disks on your computer. See which of them is the USB drive (look at the size of the disk to determine which one it is). If you have only one hard drive on your computer, the USB stick will usually be Disk 1 (we will take this case as an example)
3. “SELECT DISK 1” (again, be sure that you have the same number for your USB flash drive)
4. “CLEAN”
5. “CREATE PARTITION PRIMARY”
6. “SELECT PARTITION 1”
7. “ACTIVE”
8. “FORMAT FS=NTFS” and wait for the format to complete (it takes about 10 minutes on a 8GB flash drive)
9. “ASSIGN”
10. “EXIT” – this will exit the “diskpart” utility, but the command prompt will still remain opened. Do not close it because you will use it later on. Now your USB flash drive is seen as a partition, this will allow you to create the boot drive for the Windows 7 operating system also, mount your .ISO image to a virtual drive.
11. “D: CD BOOT” (where “D” is the drive letter of your virtual drive where your .ISO file with Windows 7 is mounted)
12. “CD BOOT”
13. “BOOTSECT.EXE /NT60 X:” (where “X” is the letter of your USB flash drive)
Copy all the files from the .ISO file to your USB flash drive and after the process is completed, you are done. Now, with your copy of Windows 7 ready to go, you can perform the normal installation. Select your USB drive as the boot source and install the operating system. It is quite a shame that Microsoft does not implement a feature that allows users to downgrade automatically to an older version of Windows. Especially now, when Windows 8 is so different from the older versions and it might not be to the liking of everyone.